In Junos , OSPF authentication can come in one of three ways; none, simple or MD5.
The default is to have no authentication. This means that the router will form a neighbor relationship with a neighboring router as long as the proper fields in the OSPF Hello’s are matching.
Another option is to have simple (plain-text) authentication. When simple authentication is configured, every packet will include a plain-text password.
The third option offered by Junos is MD5 authentication. When this type of authentication is enabled, the OSPF packets will exchange an MD5 checksum.
When you want to use MD5 authentication on Junos, you have to configure a key under the interface configuration in OSPF. The key consists of a number (anything between 0 and 255) and a password. A thing worth noting is it that if multiple keys are configured, the key with the highest value will be used.
Optionally, you can also define a start-time to indicate when the router should start using the key. When you associate a start-time with a certain key, and the start-time is reached, that key will be used regardless of the values associated with the other keys. When you have multiple keys with start-times configured, the key with the most recent start time will be selected.
This enables a smooth transition from old to new keys. Do make sure that the key values on both routers match. The key ID itself is exchanged as well and must match.
That being said, let’s apply some authentication to the routers currently in the lab.

Plain-text authentication.
Configuring plain-text authentication can hardly be called a task:

The command above will have R13 start sending the plain-text password in every OSPF packet. R13 will, from now on, also require that the neighboring router includes the same plain-text password in every packet.
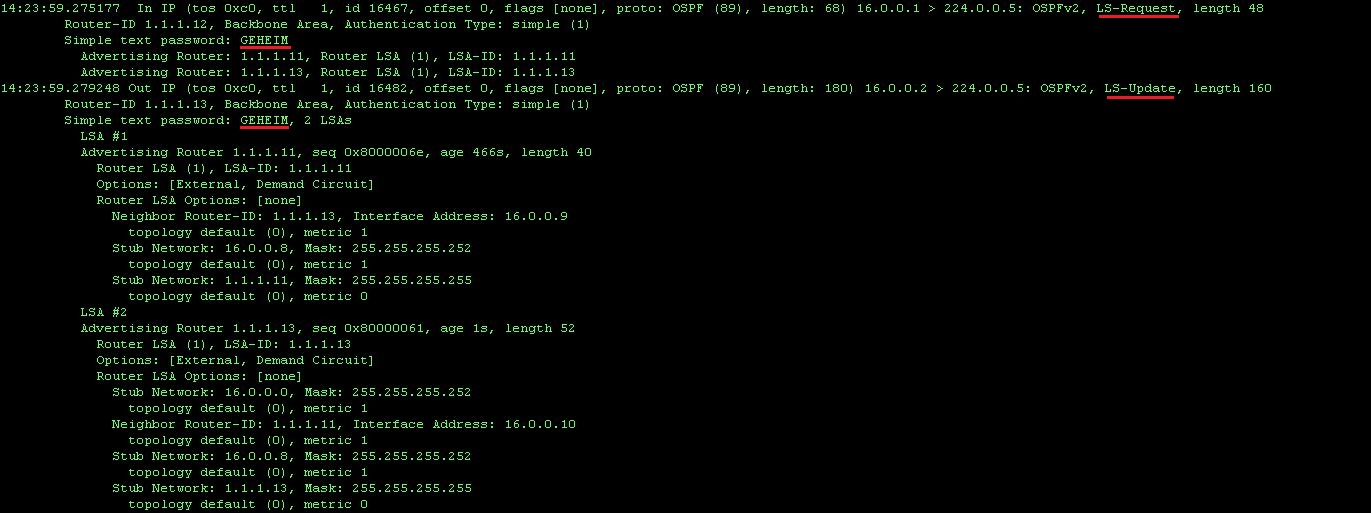
In order to see just how plain-text this plain-text is, let’s monitor traffic sent to the control plane of the router:

When we monitoring the interface, we can verify that all packets will include that plain-text password. The output below shows R12 sending an LSR to R13, during the loading phase of the neighbor relationship establishment:

MD5 authentication.
Configuring MD5 authentication can be done in the following way;

After configuring R11 for MD5 authentication, the following can be seen when the interface is monitored:

Here we see that instead of the plain-text password, the key-id and a cryptographic sequence number is send together with each packet.
Again, the key-id must match on both routers and the highest key that is configured will win.
21-9-2014