JSNAPy allows you to create snapshots that capture the state of devices running Junos. After capturing the device state, you can run tests against these snapshots. These tests can tell you if there is something to worry about or not.
The thing I love using JSNAPy for the most is pre- and post- change validation. If you are performing a change on a device that has 100+ interfaces and that is also enabled for OSPF, BGP, LDP, LLDP, RSVP and LACP, you spend quite some time validating that operations have returned to normal after executing a change. It is error-prone, time consuming and it is no fun at all. Especially if you are executing a change during a nightly maintenance window.
With JSNAPy, you write out your test cases in advance. When you have your maintenance, the test cases are executed in seconds.
This walkthrough will cover what JSNAPy is, how it works and how it is configured. After this, we will write a few test cases and execute those using the CLI.
What is JSNAPy
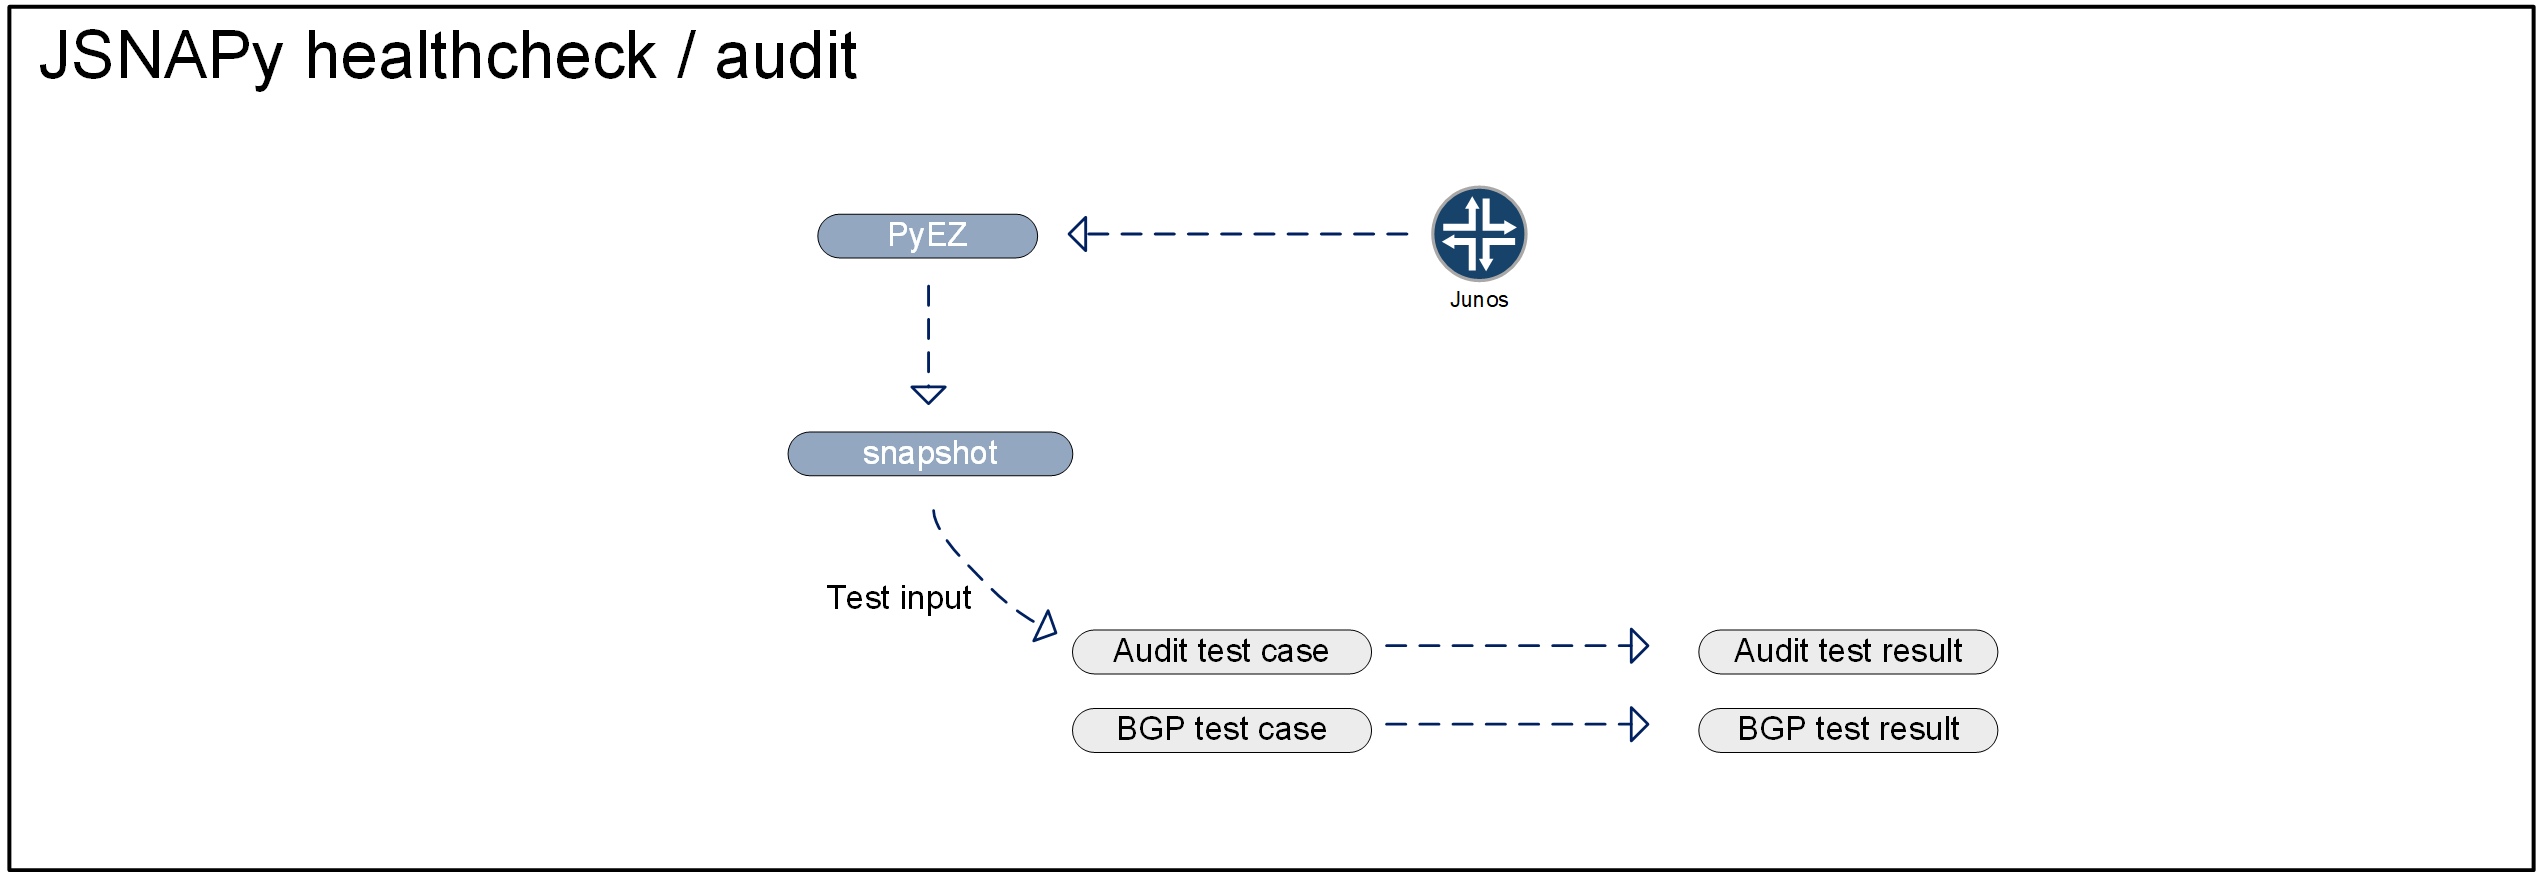
JSNAPy stands for Junos Snapshot Administrator in Python. It leverages the Juniper API to retrieve data from the device. You can specify an RPC or a CLI that needs to be executed. JSNAPy can then execute that RPC or CLI and the data returned by the device is then stored as a snapshot:

By default, the snapshots are stored on the local system that is running JSNAPy. You have the option of storing captured snapshots in a database.
The test cases that JSNAPy executes against the snapshots are written according to a fixed format (more on that later). JSNAPy test cases can be written in such a way that data from a single or from 2 snapshots are analyzed.
JSNAPy can be used as a CLI tool where you run the configured checks manually. Apart from working very well, it is also a very convenient way to learn how JSNAPy works. In addition to using it on the CLI, you can use JSNAPy in your Python scripts. This makes the framework very flexible (I use it in SaltStack for example). And to make it easier for Ansible users, Juniper also supplies an Ansible module.
JSNAPy use cases
One thing that JSNAPy can be used for is to perform checks against a single snapshot from a device. This works by having JSNAPy create a snapshot and applying several tests against it. Reasons for doing this can be because you are going through an audit and you have to prove, or verify, that every device has the proper configuration applied.
In addition to compliance checks, you can also run tests against a single snapshot in order to perform health checks. You can use these health checks to periodically verify the state of your network or to tell you whether or not it is safe to start a change. You could, for example, verify that all configured BGP peers are up and that the CPU utilization is below a certain threshold and use that to determine whether or not you are good to go and start a change on the network.
JSNAPy can be made to capture snapshots for a single device or for groups of devices. This means that after you have invested some time into writing the checks, running these checks across all devices becomes effortless.

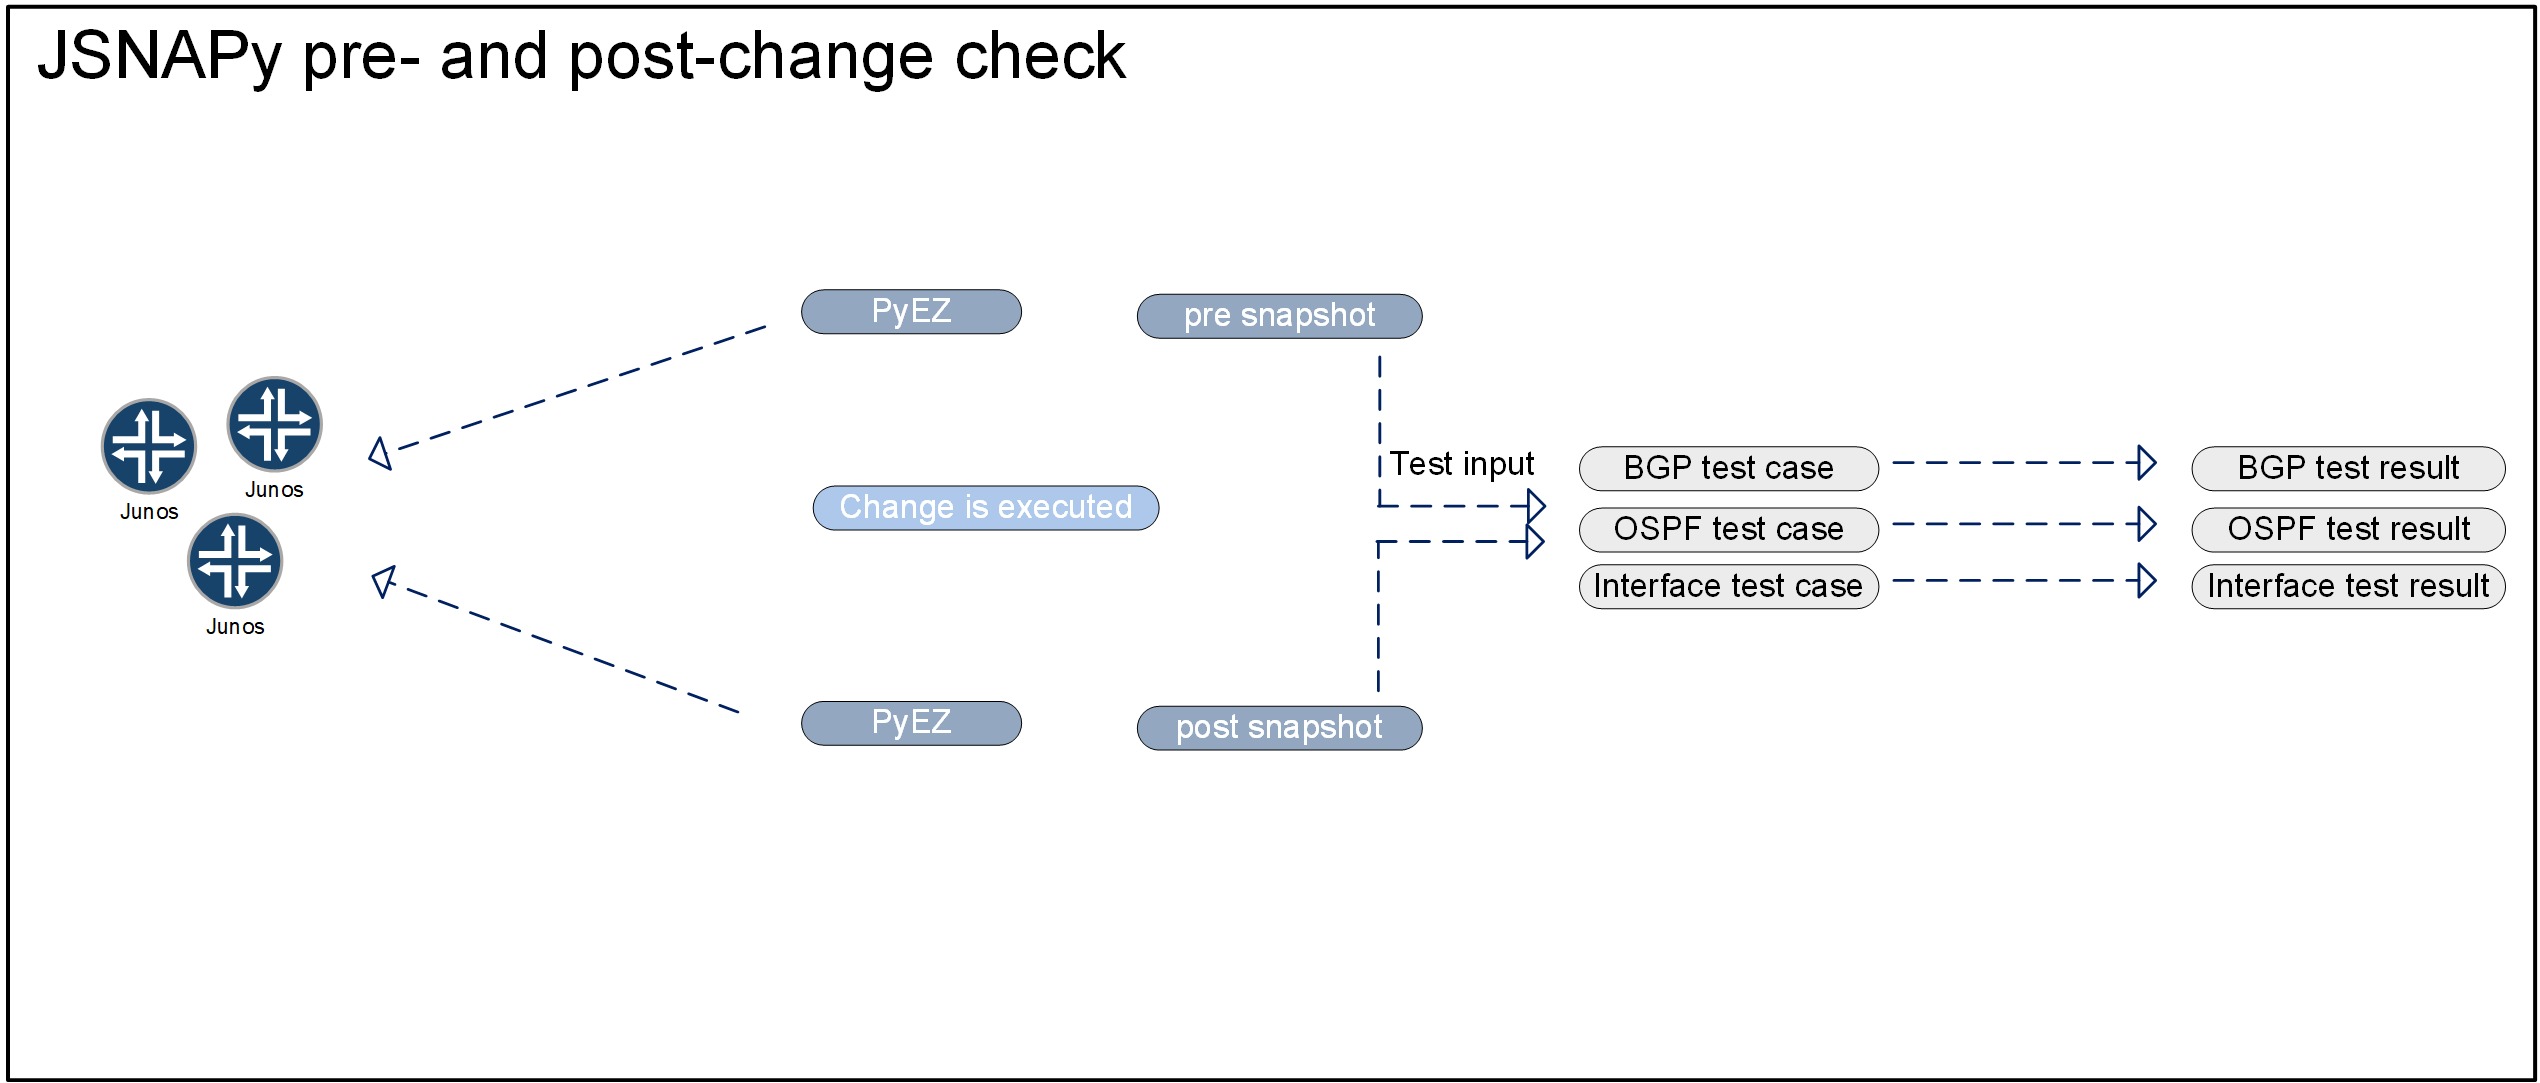
Another use case is using JSNAPy for pre- and post-change checks. When you are performing complex changes on multiple devices, there is usually a whole variety of things you need to make sure are working before as well as after the change. And usually, this is the case for multiple devices in your network. Using JSNAPy, you can collect state before you start your change. After collecting your initial snapshot, you can test for changes and conditions by comparing subsequent snapshots to the one you created before the change. Did I lose a BGP session anywhere? Did a BGP session bounce during my maintenance? Do I have the same amount of interfaces and LLDP neighbors listed before as well as after the change?

Installing and configuring JSNAPy
To install JSNAPy, run pip install jsnapy. The /etc/jsnapy/jsnapy.cfg file contains the default path for configuration files, snapshots and test files. In this example, we are using the following configuration:
#config_file_path: path of main config file
#snapshot_path : path of snapshot file
#test_file_path: path of test file

[DEFAULT]
config_file_path= /etc/jsnapy
snapshot_path = /home/said/snapshots
test_file_path = /home/said/testfiles
We also need a configuration file that contains our target device as well as the tests we need to run. We will use the following /etc/jsnapy/snap_config.yaml:
hosts:
  - device: ar01.wdc
    username: lab
    passwd: test123
tests:
  - test_bgp.yaml
This test will target 1 device and run the tests defined in the test_bgp.yaml file. Due to our previous configuration, the path JSNAPy expects for the test file is the following: /home/said/testfiles/test_bgp.yaml.
We referenced the test in snap_config.yaml, but we have not created it yet. Let’s start off writing a test that will inform us on whether or not a BGP peer flapped.
Writing your first test file
As a first test, we want JSNAPy to tell us if any of our BGP peers flapped. This information is returned when we issue the show bgp summary command. We start off naming the test and putting in the command that we want JSNAPy to execute:
test_bgp_summary:

  - command: show bgp summary
The next thing we add to the test is the instruction to iterate all BGP peers. We do this by supplying an xpath expression that identifies the node we are after.
JSNAPy snapshots and tests work against the XML that the Juniper device API returns. So on the device, we use show bgp summary | display xml to see what the device will return:
said@ar.dal-re0> show bgp summary | display xml
<rpc-reply xmlns:junos="http://xml.juniper.net/junos/15.1X53/junos">
    <bgp-information xmlns="http://xml.juniper.net/junos/15.1X53/junos-routing">
        <group-count>5</group-count>
        <peer-count>63</peer-count>
        <down-peer-count>2</down-peer-count>
..<output omitted>..
        <bgp-peer junos:style="terse">
            <peer-address>10.0.0.49</peer-address>
            <peer-as>4201065544</peer-as>
            <input-messages>24816125</input-messages>
            <output-messages>3870576081</output-messages>
            <route-queue-count>0</route-queue-count>
            <flap-count>3</flap-count>
            <elapsed-time junos:seconds="21685301">35w5d 23:41:41</elapsed-time>
            <description>BGP: gr02.dal</description>
            <peer-state junos:format="Establ">Established</peer-state>
..<output omitted>..
        </bgp-peer>
        <bgp-peer junos:style="terse">
            <peer-address>10.0.0.236</peer-address>
            <peer-as>4201065544</peer-as>
            <input-messages>0</input-messages>
            <output-messages>0</output-messages>
            <route-queue-count>0</route-queue-count>
            <flap-count>1</flap-count>
            <elapsed-time junos:seconds="26730677">44w1d 9:11:17</elapsed-time>
            <description>BGP: ar01a.dal</description>
            <peer-state>Connect</peer-state>
        </bgp-peer>
..<output omitted>..
Looking at the XML, we can figure out what XPath we need to use. In case you never worked with XPath before, XPath stands for XML Path language and it can be used to select nodes in an XML document. The way XPath allows you to search through data and select what you need is extremely powerfull. There are some followup documents and resources referenced at the end of the article that you can use to learn more about XPath.
For now, let’s assume that you never used XPath before. The nice thing about JSNAPy is that you do not need to be an expert at XPath in order to successfully use it. You can keep it very straightforward and still get a lot out of the framework. In this example, we are after the bgp-peer. For this reason, we submit the following XPath: //bgp-peer. The //, means anywhere in the XML tree. And bgp-peer is the name of the node we are after.
We are going to be using the check functionality and submit the id value bgp-peer. Since we need to iterate all of the BGP peers in the returned XML, we put in the iterate statement:
test_bgp_summary:

  - command: show bgp summary

  - iterate:
      xpath: //bgp-peer
      id: peer-address
Another thing we can see in the XML is that the value we are after is called flap-count. We want to be notified in case there is a difference before and after the change. So in the tests segment, we use no-diff on flap-count. For a complete overview of the available test operators, be sure to check Chapter 5 JSNAPy Test Operators from the Junos Snapshot Administrator in Python Guide.
As an info message, shown only when we run the check in debug mode, we will print that a peer did not register any flaps. In case a BGP peer flapped, we want to print an err message to screen that tells us what peer address flapped. We also want to understand how often it flapped, so we return the pre and post change value:
test_bgp_summary:

  - command: show bgp summary

  - iterate:
      xpath: //bgp-peer
      id: peer-address
      tests:
        - no-diff: flap-count
          info:  "Succes!  did not register flaps."
          err:  "FAIL!!  flapped. Pre-change: . Post-change: "
We now have JSNAPy configured and we have our first test created. The first test iterates all BGP peers and it will inform us if the value we are interested in shows any difference between the two snapshots. Let’s see how we can put all this to use.
Running pre and post change checks
After having things setup, we run a pre and post change check:
/ # jsnapy --snap pre -f snap_config.yaml
Connecting to device ar01.wdc ................
Taking snapshot of COMMAND: show bgp summary
/ #
/ # jsnapy --snap post -f snap_config.yaml
Connecting to device ar01.wdc ................
Taking snapshot of COMMAND: show bgp summary
/ #
What happened here is JSNAPy logged into the device to make an API call. It translated the show bgp summary command to an RPC and stored the XML return in the snapshot directory.
In order to run our test, we issue the following command:
/ # jsnapy --check pre post -f /etc/jsnapy/snap_config.yaml
**************************** Device: ar01.wdc ****************************
Tests Included: test_bgp_summary
************************* Command: show bgp summary *************************
PASS | All "flap-count" is same in pre and post snapshot [ 63 matched ]
------------------------------- Final Result!! -------------------------------
test_bgp_summary : Passed
Total No of tests passed: 1
Total No of tests failed: 0
Overall Tests passed!!!
There were no failures in this case, but how do we know that our XPath and parameters identified the correct values? And how do we know whether or not our test case will detect actual BGP flaps?
First, we check what BGP peers our test identifies. To this end, we use the debug flag:
/ # jsnapy --check pre post -f /etc/jsnapy/snap_config.yaml -v
jsnapy.cfg file location used : /etc/jsnapy
Configuration file location used : /etc/jsnapy
**************************** Device: ar01.wdc ****************************
Tests Included: test_bgp_summary
************************* Command: show bgp summary *************************
----------------------Performing no-diff Test Operation----------------------
Succes! 10.0.104.20 did not register flaps.
Succes! 10.0.10.242 did not register flaps.
Succes! 10.0.114.249 did not register flaps.
Succes! 10.0.10.228 did not register flaps.
Succes! 10.0.160.236 did not register flaps.
Succes! 10.0.182.254 did not register flaps.
Succes! 2100:f0d0:1f00:8000::2 did not register flaps.
... output omitted ...
PASS | All "flap-count" is same in pre and post snapshot [ 63 matched ]
------------------------------- Final Result!! -------------------------------
test_bgp_summary : Passed
Total No of tests passed: 1
Total No of tests failed: 0
Overall Tests passed!!!
Using the debug flag, we can see the informational message that we put in our test.
Next is to verify that our tests work. We can do this by altering the flap-count for 2 BGP neighbors in the snapshot file. In this example, it is the /home/said/snapshots/ar01.wdc_post_show_bgp_summary.xml file that needs to be edited. After increasing the flap-count for 2 BGP neighbors, we run the check again. This time, we get the following result:
/ # jsnapy --check pre post -f /etc/jsnapy/snap_config.yaml
**************************** Device: ar01.wdc ****************************
Tests Included: test_bgp_summary
************************* Command: show bgp summary *************************
FAIL!! 10.0.13.49 flapped. Pre-change: ['3']. Post-change: ['13']
FAIL!! 10.0.18.229 flapped. Pre-change: ['0']. Post-change: ['1']
FAIL | All "flap-count" is not same in pre and post snapshot [ 61 matched / 2 failed ]
------------------------------- Final Result!! -------------------------------
test_bgp_summary : Failed
Total No of tests passed: 0
Total No of tests failed: 1
Overall Tests failed!!!
Expanding the number of test cases and devices
Expanding the test cases can be done in multiple ways. First, let’s add one additional BGP test in the same test file. We want to be able to ensure that when we finish our maintenance, there are 0 BGP peers down. To this end, we add an additional test at the bottom of our existing test_bgp.yaml:
test_bgp_summary:

  - command: show bgp summary

  - iterate:
      xpath: //bgp-peer
      id: peer-address
      tests:
        - no-diff: flap-count
          info:  "Succes!  did not register flaps."
          err:  "FAIL!!  flapped. Pre-change: . Post-change: "

  - item:
      xpath: //bgp-information
      tests:
        - is-equal: down-peer-count, 0
          info:  "Succes! None of the configured BGP peers are down."
          err:  "FAIL! There are  peers down"
We use item instead of iterate because we are interested in the first node of the XPath. The down-peer-count is a sub-element bgp-information, so that becomes the XPath expression.
We can also decide to run some additional tests on other things besides BGP. Let’s create a separate file for an interface test as well as an OSPF test.
First the interface test in /home/said/testfiles/test_interfaces.yaml:
test_router_interface:

  - command: show interface terse

  - iterate:
      xpath: //physical-interface
      id: name
      tests:
        - no-diff: oper-status
          info: "Success! The operational status of interfaces pre and post change is the same."
          err: "Fail ! Interface  changed from  to ."
For this test, we iterate the physical interfaces present on the device and check the oper-status. We use no-diff so that we are informed of anything that changed. In case something changes, we print the interface name and state changes to screen.
As you can see, the patter used for the interface test is very similar to what we used for the BGP peer check. The XPath referenced the physical-interface instead of bgp-peer. Furthermore, the id and no-diff differ because in this case, we are interested in the value from other fields. However, the overall setup and logic of the test is the same. We can also use this pattern and logic to test LLDP neighbors, LDP sessions, IS-IS adjacencies, etc.
After this, we define an OSPF test in the /home/said/testfiles/test_ospf.yaml file:
ospf_interface:
  - command: show ospf interface
  - iterate:
      xpath: //ospf-interface[interface-name != "lo0.0"]
      tests:
        - is-gt: neighbor-count, 0
          info: "Success! There is at least 1 OSPF neighbor found behind "
          err: "FAIL! There are no neighbors found behind "

ospf3_interface:
  - command: show ospf3 interface
  - iterate:
      xpath: //ospf3-interface[interface-name != "lo0.0"]
      tests:
        - is-gt: neighbor-count, 0
          info: "Success! There is at least 1 OSPF neighbor found behind "
          err: "FAIL! There are no neighbors found behind "
In this case, we put 2 tests in the same file. One for OSPF and another one for OSPF3. To indicate that a lot more is possible using XPath, I ‘spiced’ things up a little. The OSPF test will check all interfaces that are enabled for OSPFv2 or OSPFv3 skipping the lo0.0 interface ([interface-name != “lo0.0”]). It will check the neighbor count, and in case the neighbor count is 0, the test will fail.
After creating the tests, we need to plug them in /etc/jsnapy/snap_config.yaml. While we add the tests, let’s also add another host to run the tests against:
hosts:
  - device: 10.253.158.251
    username: lab
    passwd: test123
  - device: 10.45.17.7
    username: lab
    passwd: test123
tests:
  - test_bgp.yaml
  - test_ospf.yaml
  - test_interfaces.yaml
Now that we have things set up, let’s run the tests:
/ # jsnapy --snap pre -f snap_config.yaml
Connecting to device 10.253.158.251 ................
Taking snapshot of COMMAND: show bgp summary
Taking snapshot of COMMAND: show ospf interface
Taking snapshot of COMMAND: show ospf3 interface
Taking snapshot of COMMAND: show interface terse
Connecting to device 10.45.17.7 ................
Taking snapshot of COMMAND: show bgp summary
Taking snapshot of COMMAND: show ospf interface
Taking snapshot of COMMAND: show ospf3 interface
Taking snapshot of COMMAND: show interface terse
/ #
/ # jsnapy --snap post -f snap_config.yaml
Connecting to device 10.253.158.251 ................
Taking snapshot of COMMAND: show bgp summary
Taking snapshot of COMMAND: show ospf interface
Taking snapshot of COMMAND: show ospf3 interface
Taking snapshot of COMMAND: show interface terse
Connecting to device 10.45.17.7 ................
Taking snapshot of COMMAND: show bgp summary
Taking snapshot of COMMAND: show ospf interface
Taking snapshot of COMMAND: show ospf3 interface
Taking snapshot of COMMAND: show interface terse
/ #
/ #
/ # jsnapy --check pre post -f /etc/jsnapy/snap_config.yaml
************************** Device: 10.253.158.251 **************************
Tests Included: test_bgp_summary
************************* Command: show bgp summary *************************
PASS | All "flap-count" is same in pre and post snapshot [ 36 matched ]
PASS | All "down-peer-count" is equal to "0" [ 1 matched ]
************************** Device: 10.253.158.251 **************************
Tests Included: ospf_interface
************************ Command: show ospf interface ************************
PASS | All "neighbor-count" is greater than 0" [ 8 matched ]
Tests Included: ospf3_interface
*********************** Command: show ospf3 interface ***********************
PASS | All "neighbor-count" is greater than 0" [ 8 matched ]
************************** Device: 10.253.158.251 **************************
Tests Included: test_router_interface
*********************** Command: show interface terse ***********************
PASS | All "oper-status" is same in pre and post snapshot [ 191 matched ]
------------------------------- Final Result!! -------------------------------
test_bgp_summary : Passed
ospf_interface : Passed
ospf3_interface : Passed
test_router_interface : Passed
Total No of tests passed: 5
Total No of tests failed: 0
Overall Tests passed!!!
**************************** Device: 10.45.17.7 ****************************
Tests Included: test_bgp_summary
************************* Command: show bgp summary *************************
PASS | All "flap-count" is same in pre and post snapshot [ 49 matched ]
PASS | All "down-peer-count" is equal to "0" [ 1 matched ]
**************************** Device: 10.45.17.7 ****************************
Tests Included: ospf_interface
************************ Command: show ospf interface ************************
PASS | All "neighbor-count" is greater than 0" [ 8 matched ]
Tests Included: ospf3_interface
*********************** Command: show ospf3 interface ***********************
PASS | All "neighbor-count" is greater than 0" [ 8 matched ]
**************************** Device: 10.45.17.7 ****************************
Tests Included: test_router_interface
*********************** Command: show interface terse ***********************
PASS | All "oper-status" is same in pre and post snapshot [ 73 matched ]
------------------------------- Final Result!! -------------------------------
test_bgp_summary : Passed
ospf_interface : Passed
ospf3_interface : Passed
test_router_interface : Passed
Total No of tests passed: 5
Total No of tests failed: 0
Overall Tests passed!!!
Whenever we use JSNAPy, the snapshots and checks are run for all the devices referenced in the /etc/jsnapy/snap_config.yaml file.
Conclusion
The example tests I use here barely scratch the surface of what is possible. At the same time though, the pattern of iterating a certain element and doing a no-diff or ensuring that a certain value is present will get you a long way. We saw that there was no big difference between checking the BGP flap count and checking for state changes in the interfaces. We can apply similar logic to check LDP sessions, RSVP LSPs, LLDP neighbors, line-cards, etc. We basically need to input a command, the XPath that defines what part of the XML tree to iterate. After this, we specify what field to test and when the test fails/succeeds.
You write the tests once and you reap the benefit during every maintenance.
Additional resources:
Here are several additional resources that are worth checking out. They include resources that are useful in case you want to learn more about XPath and several resources that are worth checking out in case you want to learn more about JSNAPy.
Video tutorial on XPath by Jeremy Schulman:
Jeremy Schulman did a great XPath tutorial that is definately worth watching. You can check it out right here.
The JSNAPy github repo:
Obviously, this is worth checking out as it contains all JSNAPy code:
In the repo, there is a WIKI and in addition to that, there is also a directory with a lot of examples that you can use as an example for your own test cases:
Junos Snapshot Administrator in Python
This is a comprehensive adminstrator guide that Juniper provides. It contains all you need to know to work effectively with JSNAPy.
Junos Snapshot Administrator in Python Guide PDF
Junos Snapshot Administrator in Python Guide
Enabling Automated Network Verifications with JSNAPy
This is a day one book that contains a lot of additional information and example test cases that can be very usefull. I highly recommend downloading it from the Juniper website and reading through it.
Quickly testing XPath on XML output:
Getting more familiar and accustomed to using XPath expressions can be frustrating in the beginning. You can practice and play with XPath expressions relatively easy. Consider grabbing the XML from a Juniper device like so:
said@ar.dal-re0> show bgp summary |display xml
<rpc-reply xmlns:junos="http://xml.juniper.net/junos/15.1X53/junos">
    <bgp-information xmlns="http://xml.juniper.net/junos/15.1X53/junos-routing">
        <group-count>5</group-count>
        <peer-count>65</peer-count>
        <down-peer-count>2</down-peer-count>
  ..<output omitted>..
        <bgp-peer junos:style="terse" heading="Peer                     AS      InPkt     OutPkt    OutQ   Flaps Last Up/Dwn State|#Active/Received/Accepted/Damped...">
            <peer-address>10.0.13.48</peer-address>
            <peer-as>4201065544</peer-as>
            <input-messages>24675776</input-messages>
            <output-messages>4033821163</output-messages>
            <route-queue-count>0</route-queue-count>
            <flap-count>3</flap-count>
            <elapsed-time junos:seconds="22238121">36w5d 9:15:21</elapsed-time>
            <description>R1</description>
            <peer-state junos:format="Establ">Established</peer-state>
            <bgp-rib junos:style="terse">
                <name>inet.0</name>
                <active-prefix-count>0</active-prefix-count>
                <received-prefix-count>1</received-prefix-count>
                <accepted-prefix-count>1</accepted-prefix-count>
                <suppressed-prefix-count>0</suppressed-prefix-count>
            </bgp-rib>
            <bgp-rib junos:style="terse">
                <name>bgp.l3vpn.0</name>
                <active-prefix-count>590</active-prefix-count>
                <received-prefix-count>590</received-prefix-count>
                <accepted-prefix-count>590</accepted-prefix-count>
                <suppressed-prefix-count>0</suppressed-prefix-count>
            </bgp-rib>
        </bgp-peer>
        <bgp-peer junos:style="terse">
            <peer-address>10.0.13.49</peer-address>
            <peer-as>4201065544</peer-as>
            <input-messages>24846590</input-messages>
            <output-messages>4139021655</output-messages>
            <route-queue-count>0</route-queue-count>
            <flap-count>3</flap-count>
            <elapsed-time junos:seconds="22236625">36w5d 8:50:25</elapsed-time>
            <description>R2</description>
            <peer-state junos:format="Establ">Established</peer-state>
  ..<output omitted>..
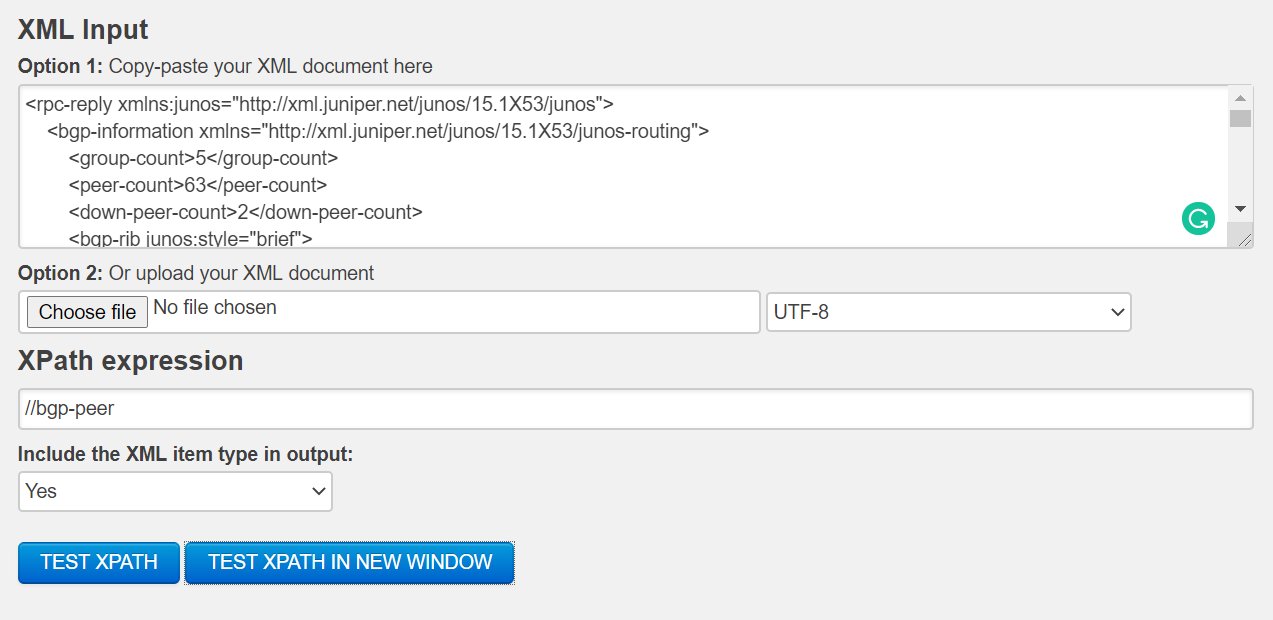
Input the XML and the XPath expression you want to test into an online tool, for instance this one: freeformatter

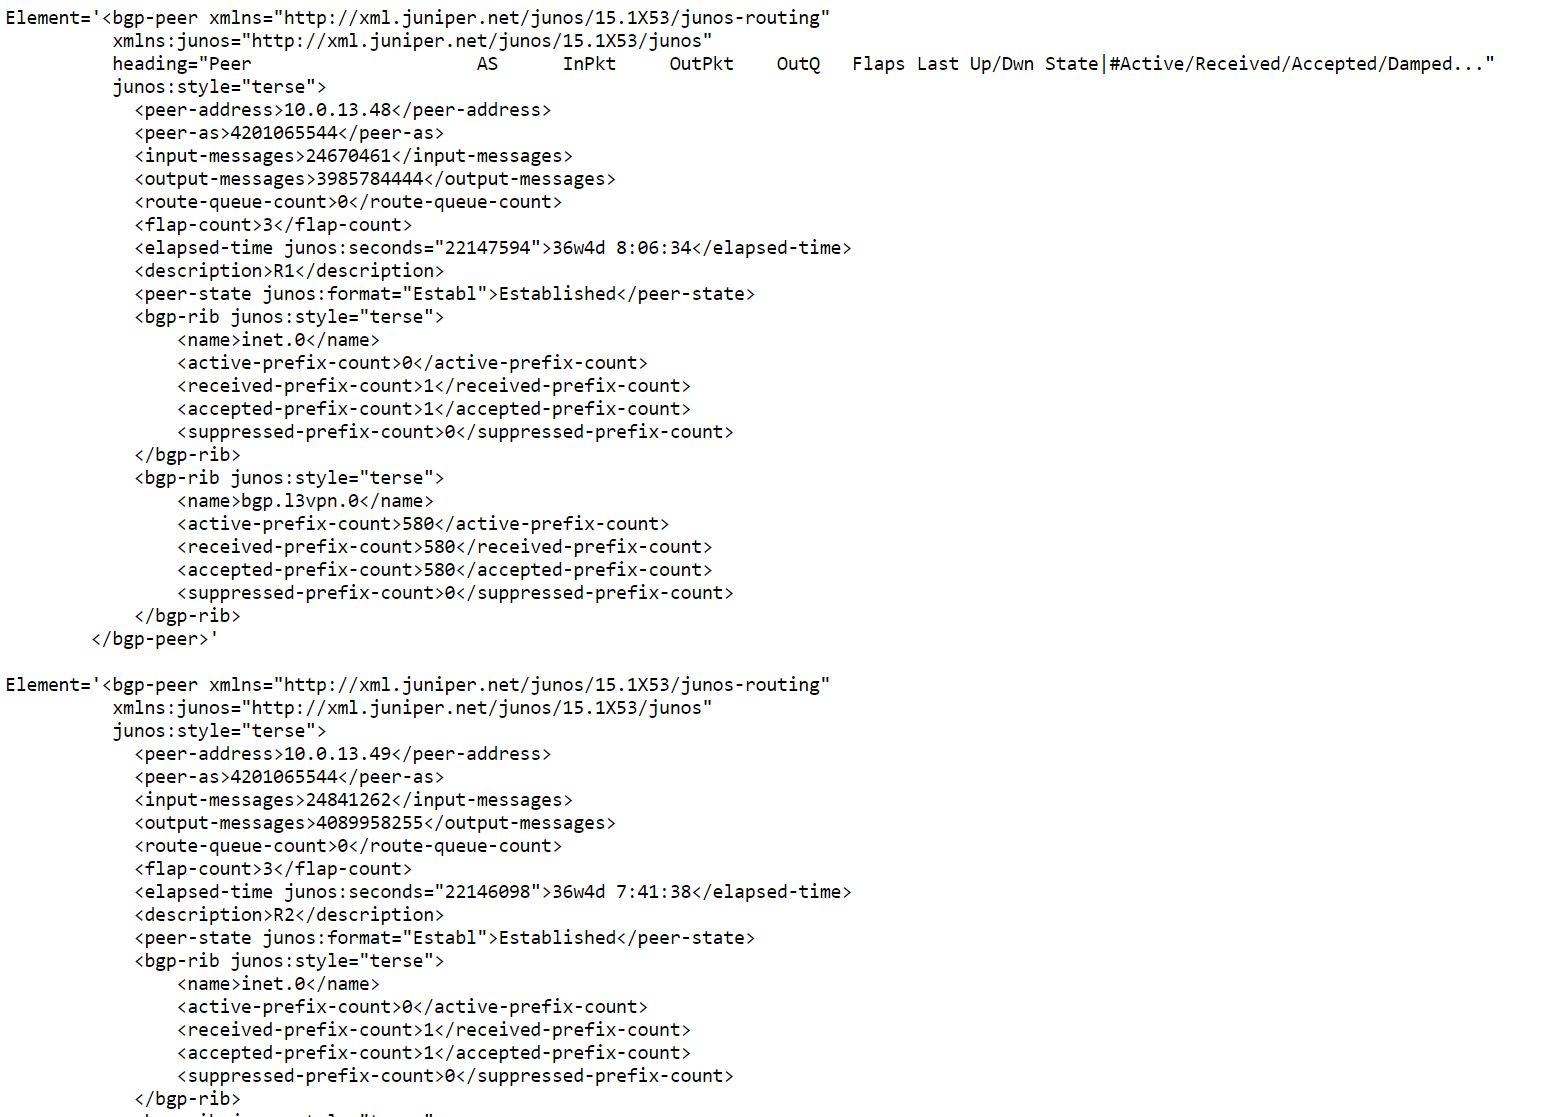
After pressing TEST XPATH, you will see what your XPath will match:
